Our DialzipTM dialup network is compatible
with all Windows operatings systems. Windows 95, 98 and ME have almost
an identical setup. To setup your account properly you should be
familiar with the dialup protocols of your operating system.
Please note that you must have an ISDN modem to
connect via ISDN mode and any normal modem will do for 56K or less connections.
Although we do not sell modems directly we do recommend several modem
vendors who often have specials.
Setup for Windows 95 and
98 and ME:
1.) Click on the Start button, point to Programs, point to Accessories,
and Click on Dial-Up Networking.
2.) In the Dial-Up Networking window, double-click on the Make New Connection
icon to start the Make New Connection wizard.
3.) Type in "WEBCS DIALZIP ACCESS" for the Computer You Are Dialing.
Make sure the correct Modem type is selected, and click on the next button.
4.) Enter the local access number provided
by WEBster Computing Services in the Area Code and Telephone Number text
boxes.
5.) Then click on the Next button. In the final wizard dialog box, click
on the Finish button to close the wizard and create the new connection.
6.) Now that you've created the connection, you need to give it more
information About your Internet Service Provider. The Dial-Up Networking
window will include a new icon for the connection to the WEBCS DIALZIP
NET, which you just created.
7.) Right-click on the new icon to display a context menu, and choose
Properties.
8.) The dialog box that appears will contain the phone number and modem
information you already entered. Click on the Server Type button.
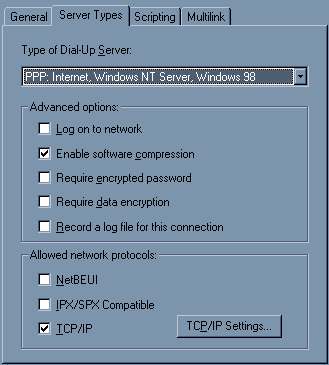
9.) At the top of the Server Types dialog box, make sure the default
setting of PPP: Windows 95 (or Windows 98 when appropriate), Windows NT
3.5, Internet is selected.
10.) Mark the Enable Software Compression check box, and clear the other
two check boxes under Advanced Options.
11.) Under Allowed Network Protocols, mark the TCP/IP check box and
clear the other two. Next, click on the TCP/IP Settings button. (example
picture below is from Windows 98)
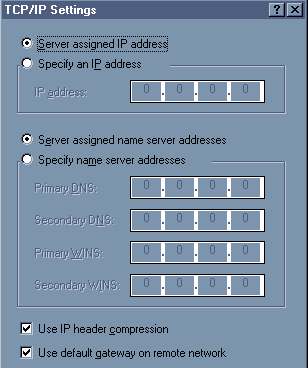
12.) Check the Server Assigned IP Address
option button because your ISP Dynamically assigns your IP address (in
other words, do not specify an IP address). Similarly, check
the server assigned name server address button
(in other words, do not specify DNS servers). Note: if your modem
or router absolutely requires DNS servers we can get them for you in most
cases.
Check the boxes labeled Use IP Header Compression and Use Default Gateway
on Remote Network, and click on OK twice to close both this dialog box
and the previous one. (example picture below is from Windows 98)
13.) Finally, to confirm that Windows will use the new connection automatically,
Double-click on My Computer icon on the Windows desktop, double-click on
Control Panel, and then double-click on the Internet Icon. Make sure that
the Use Auto Dial check box is marked and that your new connection is selected
under Settings. Then click on OK. Congratulation, your set-up is complete.
14.) To create a shortcut icon on the Windows desktop, you simply double-click
on The My Computer Icon, and then double click on the Dial-Up Networking
icon. Right drag the icon for your Internet connection onto the desktop
and choose Create Shortcut(s) Here from the context menu.
15.) Clicking on this shortcut should allow you to automatically logon.
Please note, with some Windows 95 versions a text command box may appear
after logon is complete. Click F7 if this occurs to complete your
connection.
Note: if you are using ISDN we suggest using multi-link and disabling
any bandwidth on demand feature.
| Other operating system setup | FAQ
| Troubleshooting |